By: Chris (Crosstalk Solutions)
This was a fun project. I recently ran across a YouTube video from a channel that I really like – the Cyber Weapons Lab, aka Null Byte. In this video, they discuss how to set up a Raspberry Pi as a dead drop using a downloadable Raspberry Pi image called PirateBox. A dead drop, in espionage terms is a method used to pass items or information between two individuals using a secret location, thus not requiring them to meet directly, and maintaining operational security.
The PirateBox image basically works on this concept. It allows for anonymous communication and file transfer between two or more parties. You can chat, upload and download files, or post to an forum. All completely separate from the Internet.
The PirateBox typically works by using the Raspberry Pi's wireless adapter as an access point. You place the PirateBox somewhere anonymous, and anyone that is within range can connect up with their laptop or phone and communicate or transfer files. Imagine that you're trying to anonymously transfer a file. You could set up the PirateBox at your local coffee shop, and then have someone else show up and transfer the file to you. You don't even have to know who they are or when they're transferring the file. It's a digital dead drop.
So, that's a great concept, but in thinking about this, I felt that if the range of the PirateBox could be extended, the use cases for this kind of device increase greatly. Or in other words, if you could use a point to point or point to multi point access point in front of the PirateBox, you could then have other people connect to it from miles away for secure and anonymous communication or file transfers.
Use cases:
Disaster relief communication – think of the recent Hurricane Michael that ravaged the Florida panhandle. You could set up this PirateBox in order to transfer maps or other information, and communicate securely across miles of disaster area in order to coordinate relief efforts without using the Internet.
War zones – there are wars happening all over the world all the time. Many of these places have little or no access to services such as power and Internet, so this can be a really great way to secretly communicate to your side. Pop up an access point with an omni-directional antenna in a key location such as a tall building or hill, and anyone with line of sight within miles of your location can fire up a station, connect to the network and start communicating – again, without using the Internet.
Not to mention anyone who wants to be able to anonymously and untraceably communicate and transfer files for reasons that could be completely innocent, or completely nefarious. I'm not here to judge. I'm just here to show you how it's done.
Before we get to the actual build though – let's look at the architecture we're going for:
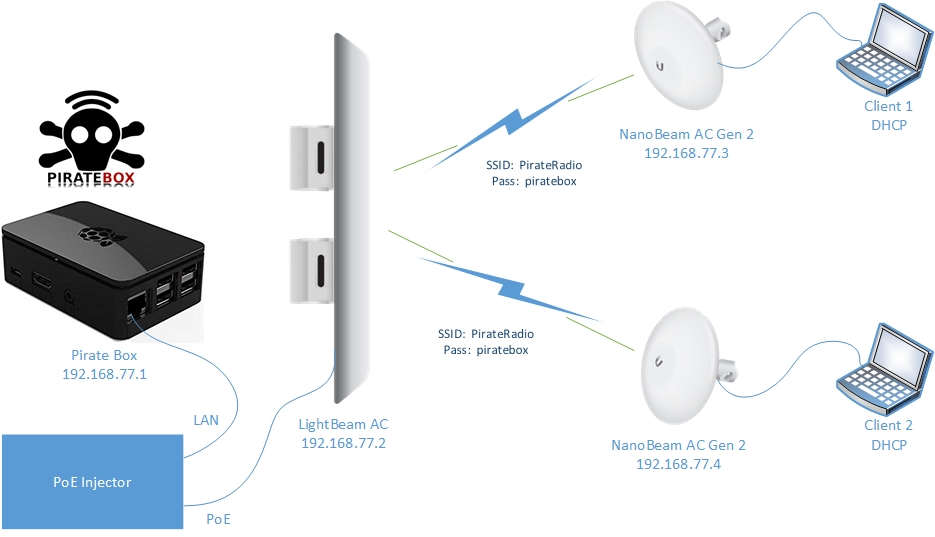
What we have here is our PirateBox on the very left hand side. The PirateBox will have eth0 configured as 192.168.77.1, and it will be providing DHCP services for the clients as well as be the only DNS server on the network.
Next, we are going to be using one of my favourite PTMP access points, the Ubiquiti LightBeam AC. This is a super lightweight, powerful, and inexpensive PTMP antenna, and it's not a huge bulky beast that needs to be set up – it is VERY portable. This access point can easily do 100Mbps or more, and has a 120 degree coverage area. We'll configure an SSID of PirateRadio with a WPA password of 'piratebox' that our client stations will connect to.
The stations that I'm using for this demo are the Ubiquiti NanoBeam AC Gen 2. Note that while I'm using this particular access point and station combo – you can pretty much use any PTP or PTMP setup, and it should work the same way.
So without further ado, let's get started.
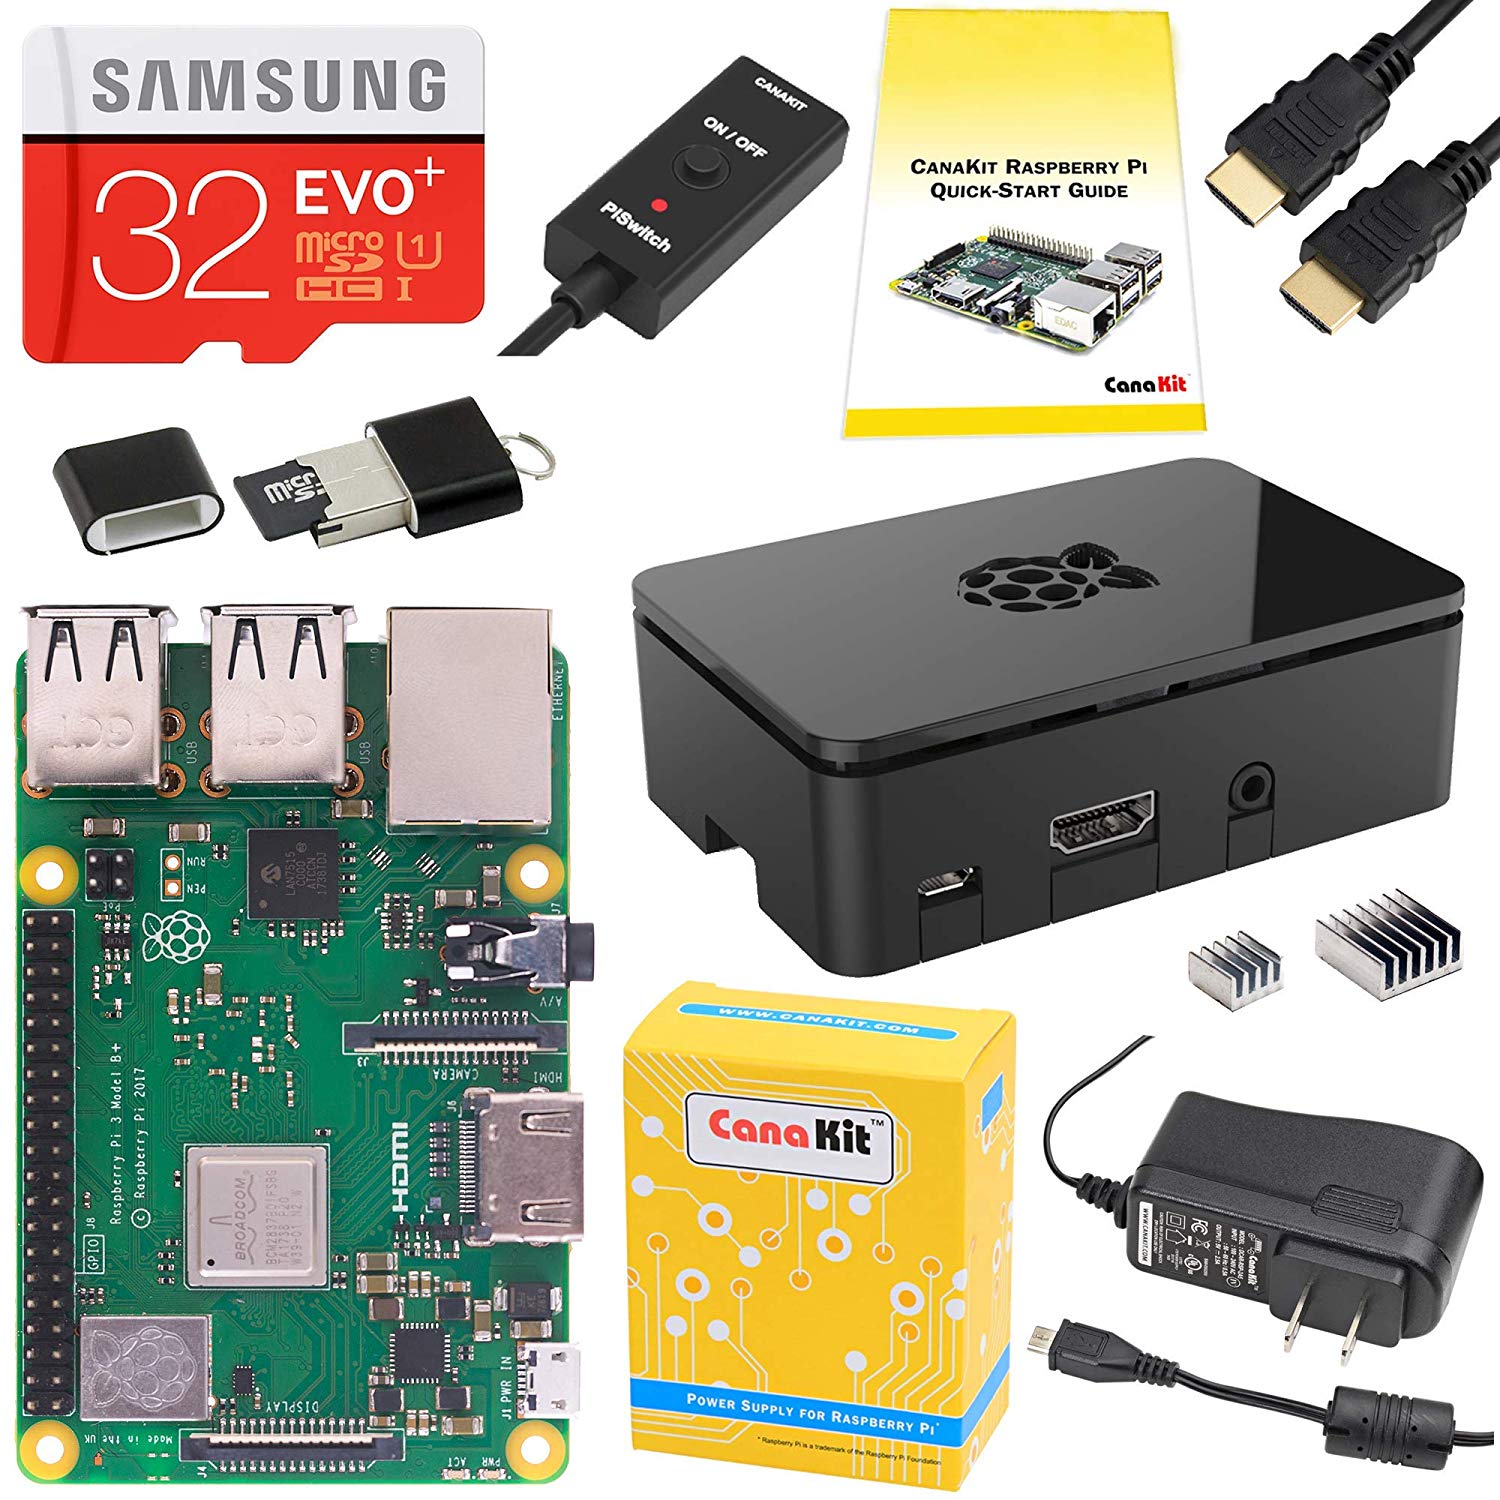
The first thing you're going to need is a Raspberry Pi with a MicroSD card. I recommend the latest model, which is the Raspberry Pi 3 model B+. I personally like the CannaKit bundles that you can get on Amazon. If you're looking for a good starter kit that comes with everything you need, including a 32GB class 10 MicroSD card, go for the CannaKit Raspberry Pi 3 B+ Starter Kit (Amazon link).
Next, you're going to have to download the PirateBox image. You can do so from this page. Just scroll down to the 'Installation' section and download the image that matches your Raspberry Pi model – in our case, with the Raspberry Pi 3 B+, we're going to use the 2nd link for Raspberry Pi 2, 3, and 3 B+. The image download links are magnet links, so you'll have to use a bittorrent client to download the file – you can see more info on bittorrent clients at that same Pirate Box link above.
The downloaded file comes as a .ZIP file, so you'll have to extract it. In Windows, it's as easy as right-clicking on the file and choosing 'Extract Here'. This will result in a new file with a .IMG extension – this is what you can now write to your MicroSD card.
To write the image to the MicroSD card, I like to use a program called Win32 Disk Imager. This is a free download and works very well. Fire up Win32 Disk Imager and hit the blue folder icon in the first section in order to browse to the Pirate Box .IMG file that you just downloaded. Then, in the 'Device' section, choose your MicroSD card.
*** IMPORTANT: DOUBLE and TRIPLE check that you have selected the correct drive letter for your MicroSD card. If you write this image to something like an external USB hard drive that you use for backing up your family photos, that data is going to be completely wiped out. Be very very careful.
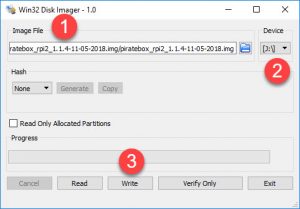
Once you have selected the PirateBox .IMG file and the MicroSD drive letter, click the 'Write' button to write the image. Hopefully you didn't just erase the only copy of Grandma's 90th birthday video.
Pop the MicroSD card into the Raspberry Pi and fire it up. Wait about 60 seconds, and you should now be able to connect wirelessly to the Pi on its default wireless IP address which is 192.168.77.1. If you open up your wireless properties, you'll want to connect to the SSID called 'PirateBox – Share Freely'. When you do so, you should be automatically redirected to your Pirate Box. I'm sure you're going to want to start poking around immediately, but WAIT – we need to do a bit of setup first.
To get started, let's SSH into the PirateBox using PuTTY or your favourite SSH client. The default login and password is 'alarm/alarm'. Upon logging in the first time via SSH, you're going to be given a laundry list of to-do items in order to get your Pirate Box fully up and running. Let's take these one at a time and get everything set up properly.
The first two steps are to change the default password for both the alarm user and root (this will be your sudo password).
passwdType the default password followed by a new STRONG password twice.
sudo passwd rootThis will prompt you for the [sudo] password for alarm first (that's the one you just set using the passwd command above), followed by a new STRONG password for the root user (I used the same password for both alarm and root).
The next thing is to set the date and time. Since this box won't be connected to NTP (no Internet access), we have to set the time manually, and then enable the time service to start upon startup.
sudo timedatectl set-ntp falsesudo date -s "20181023 2135"The first command disables NTP. The second command sets the date and time in the format YYYYMMDD HHMM.
cd /opt/piratebox && sudo ./bin/timesave.sh ./conf/piratebox.conf installsudo systemctl enable timesaveThose last two commands finalize the date/time settings.
Next, we're going to enable the Forum. Currently, if you click on 'Forum' in the top bar of the PirateBox you'll get an error stating that the Forum hasn't been set up yet. Let's set it up.
sudo /opt/piratebox/bin/board-autoconf.shThis command will prompt you for an Imageboard admin password – you can use any password, but I used the same password that I used for root.
The next thing we want to do is expand the capacity of our MicroSD card. Currently, we're barely using any of the card, and our Disk Usage on the PirateBox dashboard shows 77% utilized. That's certainly no good for file transfers, and we want to use the remaining capacity of our MicroSD card.
sudo /opt/piratebox/rpi/bin/sdcard_share.shThis will take a minute or so to complete depending on the size of your MicroSD card (mine is 32GB). Once the command is done, if you refresh the PirateBox dashboard, the Disk Usage should drop to basically nothing.
Next, we have a bunch of commands to enable the UPnP Media Server.
sudo cp /etc/minidlna.conf /etc/minidlna.conf.bkpsudo cp /opt/piratebox/src/linux.example.minidlna.conf /etc/minidlna.confsudo systemctl start minidlnasudo systemctl enable minidlnaFinally, there is one more command to enable RealTimeClock timekeeping. To be honest, I'm not exactly sure what this does, and I didn't take the time to research it.
sudo systemctl enable rpi_hwclockOK – at this point, the PirateBox is all set up. Let's take a quick tour through the simple features of this device. On the dashboard, you have an anonymous chat engine. You can select a name and chat text color and start chatting away anonymously.

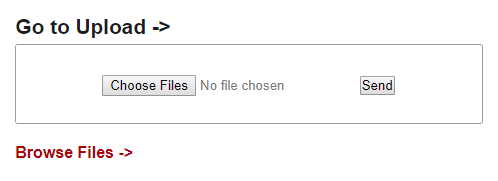
If you want to upload a file, it's as easy as clicking on the 'Choose Files' button, browsing for the file you want to upload, and then click 'Send'. To view any uploaded files, click the 'Files' button at the top of the dashboard.
Finally, if you click on Forums, you can create and reply to forum posts. This is helpful for communication that isn't realtime chat. Super simple, super easy communication.
OK, so if you just want a dead drop that you can connect to wirelessly using a laptop, phone, or tablet, you're all done at this point. But for THIS project, we're going to supersize it. Since we're not going to be using our Raspberry Pi's wireless card, we need to switch all of the PirateBox services to eth0. To do this, edit the piratebox.conf file:
sudo nano -w /opt/piratebox/conf/piratebox.confThere are a few lines we need to change in this file. Scroll down until you find:
USE_APN="yes"And change it to:
USE_APN="no"This disables the use of the wireless card as an access point. Next find this line:
INTERFACE="wlan0"And change it to:
INTERFACE="eth0"That indicates which interface we want to use for the PirateBox GUI. Right below that, you'll also see:
DNSMASQ_INTERFACE="wlan0"Change that one to eth0 as well:
DNSMASQ_INTERFACE="eth0"This tells PirateBox to use eth0 (our wired network interface) for the DHCP and DNS services. There are a couple more settings that you may or may not want to change. A little ways below the DNSMASQ setting, you should see two settings:
NET=192.168.77SHORT=1These two lines refer to the default IP address for the PirateBox. NET=192.168.77 is the class C network, and SHORT=1 is the final octet of that IP address. So, if you wanted to change the IP address of the PirateBox to 192.168.1.254 instead of the default 192.168.77.1, you would change these lines to:
NET=192.168.1SHORT=254This is completely optional though, so for our purposes, we're going to leave this default. Press CTRL+X to exit followed by Y and ENTER to save changes, and you should be back at the SSH prompt. We now need to reboot our PirateBox to pick up the new settings.
sudo rebootAfter about a minute or two, the PirateBox should be back up, and the eth0 (wired) interface should now be 192.168.77.1. You can test if DHCP works by plugging a laptop computer directly into that port, and see which IP address you receive for DHCP – it should be something in the 192.168.77.0/24 network.
OK – now we have our Pirate Box using the eth0 wired interface, and also passing out DHCP and DNS on that same interface. It's now time to move to our PTMP access point setup. Break out the LightBeam AC and factory default it. It will come back up with an IP address of 192.168.1.20 and a default user/pass of ubnt/ubnt. Configure your laptop's Ethernet interface so that it is in 192.168.1.x as well (I used 192.168.1.5), and you should be able to bring up the GUI of the LightBeam AC when you browse to 192.168.1.20.
You should get the initial login screen. Enter in the default username and password of ubnt/ubnt, select your country, and then check the box at the bottom to agree to the terms and conditions. Then click Login.
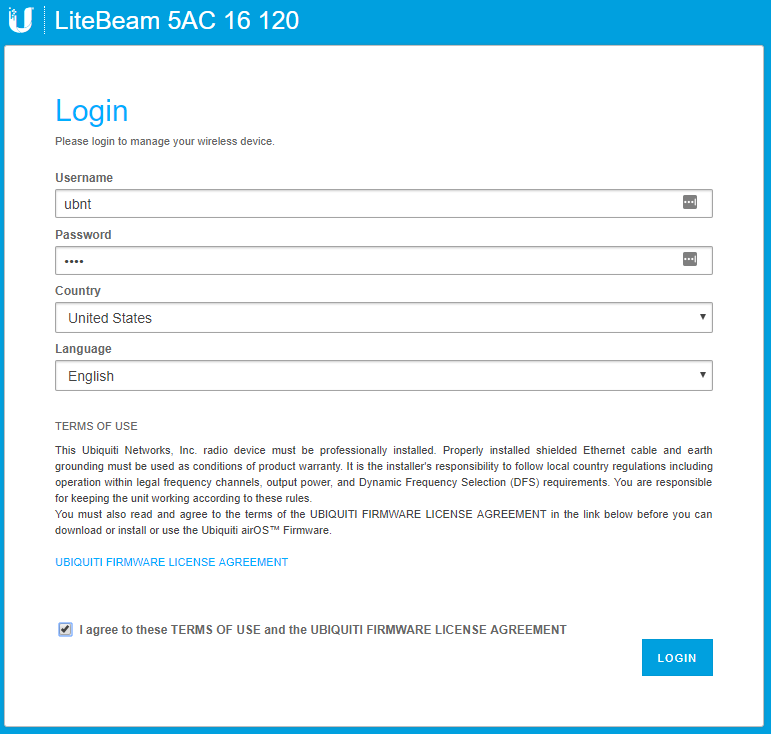
Upon logging in the first time, you will receive a warning that you are using the default password along with a button that allows you to change the password – go ahead and set the password to something strong.
Once logged in, there are two things that we need to do – we need to set up our wireless network, and we need to set a static IP address into the 192.168.77.0/24 network. Let's set up the wireless network first. Click on the 'gear' icon in the left hand menu and you are brought to the Wireless tab. We're going to set the following values:
Wireless Mode: Access Point PtMP airMAX AC
SSID: Pirate Radio
Output Power: -4 (I'm bringing it all the way down for our demo, but you should set this to the appropriate level given the distance you want to cover).
Security: WPA2-AES
WPA Preshared Key: piratebox
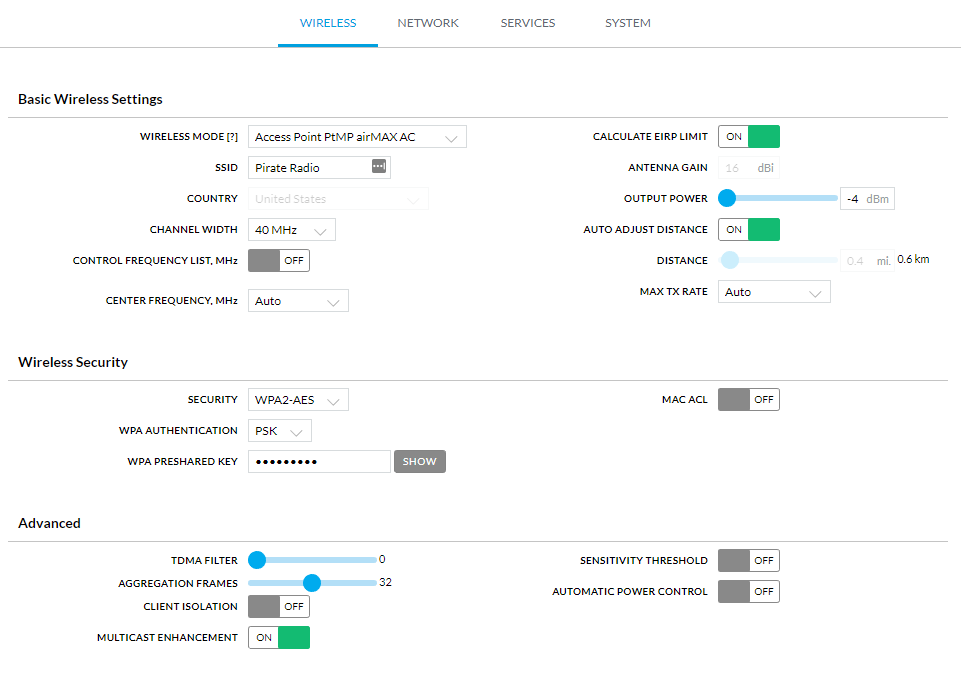
Everything else can be left default. The setup of this wireless PTMP network is going to vary depending on your environment, and the radios you're using, so some of this is going to be up to interpretation. I'm only covering the basics here to get this up and running. Click 'Save Changes' to save those settings.
Next, click on the Network tab and set the following values:
Network Mode: Bridge (this should be default – leave it as is)
IP Address: 192.168.77.2
Gateway IP: 192.168.77.1
Primary DNS IP: 192.168.77.1
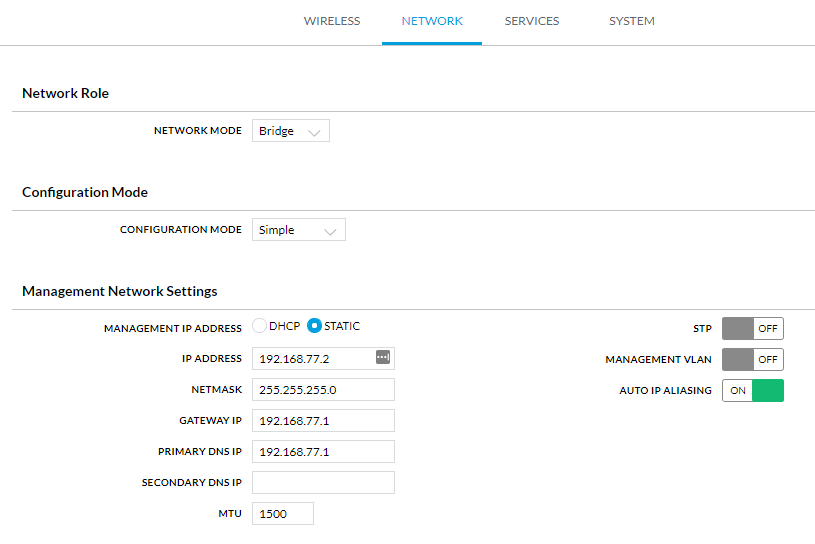
Again, this is up to your own interpretation – you just need to set the access point up with a static IP address in the same network as your PirateBox. Also, since the PirateBox's default DHCP lease range is 10-250, the static IP address that you set needs to be outside of that range. Click 'Save Changes' to save those settings.
After you save changes though, you're gonna lose connectivity to the access point – that's fine. We don't need to touch it anymore. BUT – you should now plug the AP directly into eth0 of your PirateBox (or use a switch if you want).
Now it's time to set up the Station side radio – it will be very similar. Factory reset the NanoBeam AC Gen 2 and configure your laptop into the 192.168.1.x network once again. Directly connect your laptop to the NanoBeam and browse to the default IP address of 192.168.1.20. The initial login page is identical to the LightBeam AC, and once past the login screen, you will be immediately prompted to change the default password – set it to something strong.
Click on the 'gear' icon from the left hand menu to get to the wireless settings. This time though, we want to connect to the SSID that we created in our access point. Next to the SSID field, click the 'Select' button, and a list of available SSID's will appear. You should see the 'Pirate Radio' SSID that we set up in the Access Point. Click the white circle next to that SSID and then click 'Select' to select that wireless network. Then, use these settings:
Outpower Power: -4 (again, adjust for your environment)
WPA Preshared Key: piratebox
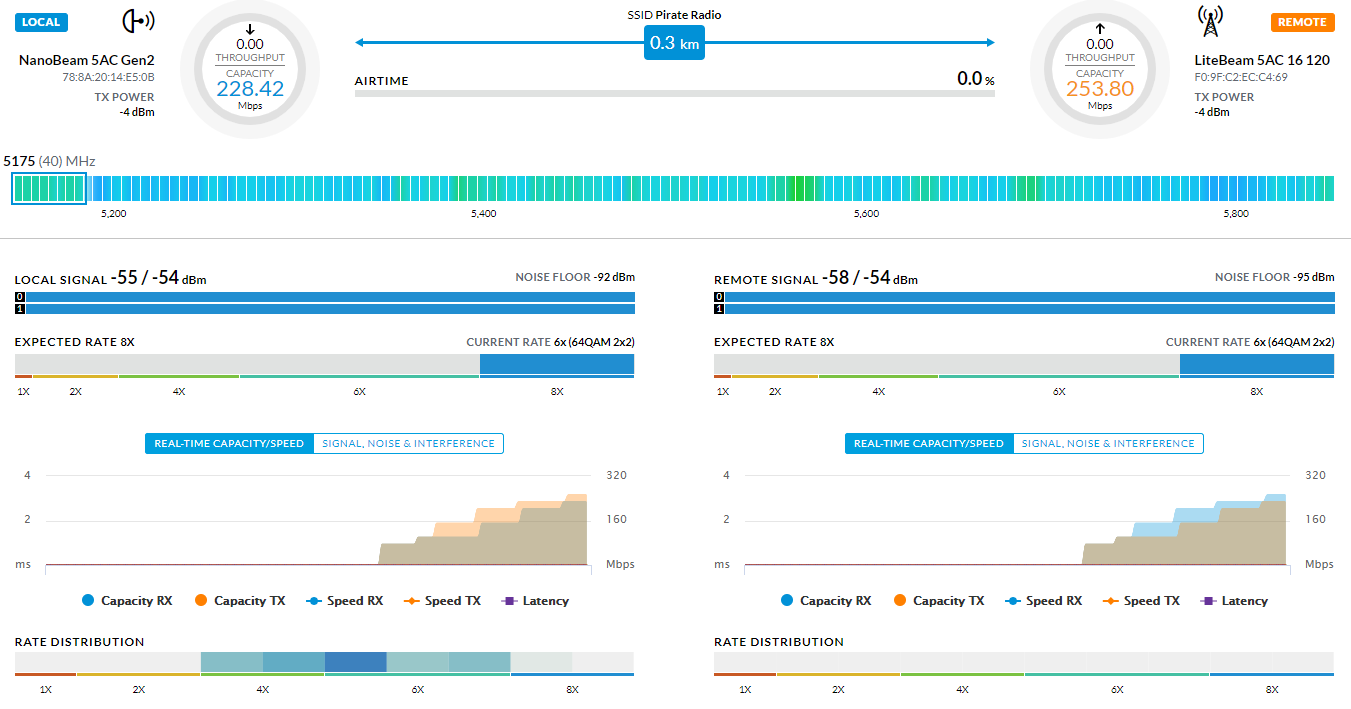
Click 'Save Changes'. If you are asked if you want to enable or disable the management radio, you can do whatever you want – I'm going to disable it since we're not using it for this project. At this point, if you click on the dashboard, you should see the station connect to the access point, and the wireless bridge is now up.
Next though, we need to change the IP address of the station, so click on the 'gear' icon again to get to settings, and then click on the 'Network' tab. Use the following settings:
Network Mode: Bridge (leave default)
IP Address: 192.168.77.3
Gateway IP: 192.168.77.1
Primary DNS IP: 192.168.77.1
Click 'Save Changes' and we are now done with the station side setup. Since you are directly connected to the station side radio, you should now be able to set your laptop's Ethernet settings back to DHCP. Repeat this same process for any additional stations that you want to connect.
*** NOTE: If you do not receive an IP address from DHCP, first try rebooting the PirateBox – that usually works. If all else fails, you can try to set your laptop to a static IP in the 192.168.77.x network to see if you can get the PirateBox interface. If you can't – then something is wrong, and go back and give it a second try!
OK, so that's it – if all went well, you now have a completely offline long range dead drop and communication device.
EDIT (10 Jan, 2019): https://null-byte.wonderhowto.com/how-to/use-raspberry-pi-as-dead-drop-for-anonymous-offline-communication-0179743/ - another source of info which I may "archive".